All posts by thesingingcook

About thesingingcook

Follow my blog to read about my adventures in fitness, cooking, travel & more!

Thai Chicken Pizza

I don’t like watching football.  There!  I said it!  I’m sorry but I just don’t have the attentions span!!!  I can barely watch a movie without getting up to check on laundry, do lunges or sit-ups, etc.  What I DO like is football parties!!  I love mingling with people, drinking beer, and most of all the huge spread of delicious food (are you surprised??).  Who the hell cares who’s winning??? It’s always fun to see what people bring.  Usually it’s stuff like chips and salsa, meatballs, & dried out wings.  I’ll eat all those things but I get really excited when I see something out of the ordinary.  How many of you have ever seen a homemade Thai Chicken Pizza at a football party?  Didn’t think so.  If you bring a Thai Chicken Pizza to a party you will definitely get invited back.  However if you don’t really like the people who’s party you’re at and are only there for the food, beer, or hot chicks and dudes,  than I’d recommend bringing frozen won-tons or boxed brownies.  I hope you thoroughly enjoy this recipe and that it makes all the other food at your football part feel self conscious!

Thai Chicken Pizza

Gluten Free/Paleo/Makes 2 Pizzas (Great for taking to a party!)

INGREDIENTS:

For the toppings-Thai chick I

  • 1 lb organic chicken thighs trimmed of excess fat
  • 1 heaping TBSP Thai Red Curry Paste
  • 1 can full fat coconut milk ( not coconut cream or anything sweetened or flavored)
  • Zest of 1 lime
  • Juice of 1 the zested lime
  • Salt & pepper
  • 1 small Japanese eggplant (sliced VERY thin)
  • 1 small red bell pepper (sliced VERY thin)
  • A couple of handfuls of Daiya Mozzarella Cheese ( Or other soy free non dairy cheese of your choice)
  • Cilantro – chop a small handful and throw on top after baking
  • Scallion – slice up a couple and throw on top after backing
  • Siracha – if so desired drizzle over top after baking

For the Thai pesto-

  • 1 small bunch of cilantro (thick stems removed)
  • 1 small bunch Thai basil (thick stems removed)
  • 1 tsp fresh ground ginger
  • 3 scallions (white & green part)
  • 2 cloves of garlic
  • ½ cup roasted cashews (salted is fine, just don’t add salt to the pesto until you taste it)
  • ¼ cup olive oil
  • Juice of 1 lime
  • Zest of 1 lime
  • 1 tsp honey
  • 1 tsp salt

For the crust- I didn’t feel like inventing the wheel here so I just doubled this Paleo pizza crust recipe: http://paleospirit.com/2014/paleo-pizza-crust-recipe/. It turned out great!  Also many stores are selling pre-made gluten free crusts or boxed crust mixes these days!

DIRECTIONS:

  • Step one (1 hour – 4 hours ahead of time): Marinade the Chicken. In a storage bowl big enough to fit all the chicken: zest lime, juice lime, add red Thai curry paste and whisk until smooth. Add the can of coconut milk and whisk again to mix.  Trim thighs, cut into bite sized strips, liberally salt and pepper, mix into coconut curry mixture, cover and refrigerate for 1 – 4 hours.  The longer you marinade the more flavor it will have!
  • Step two: Make the pesto: Wash and dry your cilantro and Thai basil (save a little bit of cilantro for garnish) Remove thick stems. From here you can seriously throw everything into your food processor and whiz it around until the consistency is VERY smooth.
  • Step 3: Cook the chicken. Heat a large non stick skillet to medium heat, coat in canola spray, drain marinade off chicken & toss in the heated skillet.  Cook until nicely brown and just cooked through (probably 8 minutes).  Pull a piece out to test it for doneness.  Remember, this is going in the oven again and you don’t want it to get tough from being over cooked : )
  • Step 4: Make your crusts (if you are making the crust from the link I gave, I suggest only par baking it for 5 -8 minutes before adding toppings. The longer you bake it the crispier it will be! Shape your pizzas into rectangles for which are easier to cut into appetizer portions for sharing!
  • Step 5: Prep the rest of your toppings. Very thinly slice your Japanese eggplant and red pepper.  You don’t want them too this otherwise they will steam on the pizza and make it soggy. Dice up a handful of cilantro
  • Step 6: Assemble pizzas (FINALLY!!!). You will have a ton of Thai pesto so don’t be shy about adding a lot to your par cooked crust.  I think I added about ½ cup per pizza.   Spread pesto all the way out to the edges but leave about ¼ of an inch. If you want to drizzle some Siracha on top of the pesto here I ain’t gonna be mad about it! Next add the cooked thigh strips, dividing evenly between the 2 pizzas.  Lastly add the thinly sliced eggplant, red pepper strips, & then sprinkle everything with CHEESE!!  I think I put about ¾ cup per pizza on mine.
  • FINAL STEP: Bake pizzas!!  Oven should be at 450 from par baking.  Put pizzas back on baking sheets and bake for 8 – 10 minutes or until crust and toppings are nicely brown.  Remove from oven, add cilantro and scallions for garnish, slice, devour!!
  • This is a ton of pizza but the cooked leftovers (if you have any) freeze like a dream! Just add cooled slices to a freezer bag and lay flat in freezer.  I usually just pull mine out of the freezer, put them on an oven safe plate and reheat in the oven until crispy for a quick dinner!

Smokey Chicken Chili

It has been unseasonably warm in Portland.  I’ll bet the North East is totes jelly!  I was chatting with one of my running buddies today and we both agreed that we wouldn’t mind being snowed in for a few days….of course if that happened everyone would would be bitching about not being able to get to the work, the store etc.  You can’t win!  However with Superbowl coming up and most of the country being pounded with chilly weather I figured it was time for a chili recipe!  I don’t use beans in my Chili because I’m not a fan but by all beans ( I meant means) feel free to throw in a couple of cans of your favorite legumes and chow down!

Smokey Chicken Chili

Gluten Free/Nut Free/Dairy Free/ Paleo – Serves about 8

INGREDIENTSchick chili

  • 1 half store bought all natural rotisserie chicken, deboned, skinned and chopped
  • 6 slices thick cut nitrate free bacon chopped
  • 1 small onion finely minced in food processor
  • 2 cloves crushed garlic
  • 2 TBSP mild chili powder
  • 1 TBSP smoked paprika
  • 1TBSP Ground Cumin
  • 1 TBSP Ground Coriander
  • 1 tsp dried oregano
  • 1/2 tsp cinnamon
  • 1 package mushrooms sliced chopped ground down in a food processor( will kind of resemble ground meat)
  • 1 green bell pepper finely minced in food processor
  • 1 red bell pepper finely minced in food processor
  • 3 dates pitted and minced
  • 1 – 32 oz box organic chicken broth
  • 2 – 14.5 oz cans fire roasted tomatoes
  • 1 medium sweet potato peeled and diced into ½ inch pieces
  • 1 small yellow squash or zucchini diced in ½ inch pieces
  • ½ bunch chopped fresh cilantro
  • Salt and pepper

DIRECTIONS

Heat a heavy soup pot to medium heat and add in chopped bacon.  Cook down until browned and fat has rendered.  Add diced onion and stir to cook down until translucent.  Add crushed garlic, all spices and stir together until fragrant.   Add in ground mushrooms, minced dates, diced red and green peppers, stir, & let simmer for about 8 minutes.  It will look kind of pasty but will start to become juicier as the veggies cook down.  Add a generous pinch of salt and pepper.  Next add in the boxed broth, fire roasted tomatoes, chopped cilantro & diced sweet potato. Once chili has come to a simmer, reduce heat and continue to simmer for 10 minutes to soften sweet potato.  Add in diced zucchini, more salt and pepper, and simmer for 5 more minutes.  Remove from heat, garnish with more cilantro and serve.

Although it will be delicious if you eat it right away, my recommendation is to cool the chili to room temperature, refrigerate overnight and reheat it the next day.  This will allow all the flavors to develop and it will be even more delicious!

Chicken “BLT” Rolls

Hey everyone!  This is seriously one of my favorite recipes.  It is healthy, full of flavor, and FULL OF BACON!!!  I have stuffed chicken breast with several different things and this if by far my favorite. It makes great leftovers, in fact, I threw my on top of a salad……are you surprised?  I really don’t think it needs any kind of fancy introduction!

“BLT”  Chicken Rolls

Chicken Rolls

Ingredients:

  • 2 boneless, skinless chicken breast    ( about a 1lb total)
  • 3 slices nitrate free bacon chopped
  • 1 pkg frozen spinach (thawed and squeezed dry)
  • 8 all natural sun-dried tomato halves re-hydrated in boiling water
  • Salt & Pepper
  • Onion powder
  • Garlic powder

Directions:

Place sun-dried tomatoes in a small bowl, cover in boiling water and let sit to re-hydrate while you work on the rest of your prep. Next in a good sized saute pan, cook chopped bacon until just golden.  Using a slotted spoon, pull bacon pieces out of the pan and set aside to drain on a paper towel lined plate.  Reserve bacon drippings in the pan for browning chicken rolls later.  Pound each chicken breast to about ¼ inch thickness in a Ziploc bag using a mallet. Lay each breast flat on its on piece of plastic wrap and liberally salt and pepper.  Next, cover each flattened breast with thawed drained spinach (to drain, place thawed spinach in a clean kitchen towel and SQUEEZE!!). Salt and pepper again, then sprinkle generously with onion powder and garlic powder.  Distribute bacon pieces even on top of each breast, then add 4 re-hydrated sun-dried tomato halves on top of each breast.  Tightly roll each breast up in plastic wrap and put in fridge for about 30 minutes to rest(optional…..screw it if your starving and in a hurry like me most of the time!)  Heat oven to 350. Unroll each breast roll and place 3 toothpicks in each breast to secure.  Reheat bacon drippings in sauté pan on medium heat, then add chicken rolls.  Brown rolls for 3 minutes on each side to seal in moisture.  After the rolls have browned, add chicken rolls to a glass 9×9  baking dish and cover with foil.  Bake at 350 for 20 minutes (longer if the chicken breast are bigger than ½ lb each.  Remove from oven and let rest for 20 minutes in covered baking dish.  Slice, plate, and enjoy!!!

Spaghetti Squash Carbonara

A few weeks ago when I started my Facebook page, I asked my followers to name some favorite dishes they would like to see recreated for maximum nourishment.  One of my awesome running buddies suggested spaghetti carbonara.  I was very excited about this because I have always wanted to try making this dish!

Many of you know that I tend to steer away from grains because they hurt my belly and make me sleepy.  A favorite pasta substitute of mine is spaghetti squash.  First of all the thought of crafting my own grain free pasta makes me want to breathe into a paper bag but more importantly I absolutely LOVE veggies of any kind (I credit my mom for getting us started on veggies at an early age and always giving us access to garden to graze on!)  Spaghetti squash contains a good amount of vitamin C, A , B-6, thiamin, riboflavin, niacin, folate, pantothenic acid and vitamin K.  It’s also lower in carbs but has a good amount of fiber so it will fill you up without the pasta bloat.

With bacon, parmesan, & fresh garlic, this dish is filling and packs a serious flavor punch without the carb overload.  Feel free to add in extras such as peas or roasted red peppers.  I ate my  leftovers with some sauteed shrimp and it was amazing.  Enjoy!

Spaghetti Squash Carbonara

Gluten Free, Paleo (leave out the cheese for full throttle Paleo) / Serves 4

Ingredients:

  • 4 cups spaghetti squash (about a 4 lb squash)IMG_1533
  • 1 Tbsp olive oil
  • 6 slices thick cut nitrate free bacon (cut into small strips)
  • 3 gloves garlic (crushed)
  • 2 eggs
  • ½ cup fresh shaved parmesan cheese
  • Salt and pepper
  • Flat leaf parsley chopped for garnish
  • Pinch of red pepper flake (optional)

Directions:

1 hour before you want to eat, heat your oven to 350 degrees.  Carefully cut off top of squash, cut it in half lengthwise and remove all the seeds and strings.  These suckers can be tough to cut through so make sure you work on a stable surface so you don’t lose a digit!  Place the squash cut-side down in a large baking dish filled with a half inch of warm water and 2 tsp of salt (mix the salt around in the water to dissolve).  Bake squash for 40 minutes or until the Squash shell gives slightly when pressed.   When squash is done remove from water and set aside until cool enough to handle.  Carefully take a fork and shred the flesh strands from the squash into a bowl and keep warm.  In a large skillet, add the olive oil then toss in the bacon strips.  Cook the bacon until it is nice and brown. In the meantime crack the eggs in separate bowl and whisk.  Add in the parmesan whisk well, and set aside.  Add the crushed garlic into the pan with the bacon and stir around with rendered fat until fragrant (about one minute).  Next, add in the spaghetti squash strands to reheat and coat in the bacon fat (about 2 minutes).  Remove the pan from the heat and quickly pour the whisked egg and cheese mixture into the squash, bacon, & garlic mixture tossing vigorously so it doesn’t turn into scrambled eggs.  Keep tossing until everything is nicely incorporated.  Plate and sprinkle with more parmesan, chopped parsley, and a little crushed red pepper if desired!

Lemon Chia Seed Protein Cookies

It’s January….I always have mixed feelings about January.  On one hand it’s depressing because the holidays are over and it’s time to get back to reality, on the other hand it’s kind of exciting to feel like you have a “fresh” start.  I was talking to some girlfriends of mine and we were discussing resolutions.  One friend said she preferred to call them goals because she’s much more likely to carry out a goal than a resolution.  I think it’s true that no matter what time of year it is, it’s always good to have a running list of goals.  I know it’s true that if you make sure to revisit those goals every morning, you’re much more likely to make them happen.  Sorry if I’m annoying anyone by sounding like a motivational speaker, I just prefer to get shit done rather than let it happen to me : )

None of what I just said has anything to do with the recipe I am about to share, it’s just what was on my mind this morning. Now, for a worthy introduction to what I think is a pretty solid protein cookie for my first crack at it.

When I was a  kid, one of the ladies that went to our church made this killer poppy-seed bread that she would give it to us as gifts on our birthdays.  It was moist and dense and the top was covered in this amazing sugary glaze.  The inner fat kid in me has always looked forward to holidays for the food above anything else so I have been a huge poppy-seed bread fan ever since.  As I have learned to adapt my diet to ward off tummy issues and keep my energy high, I’ve tried to find ways to capture my favorite flavors in food that is actually helpful to body and not harmful.  As an ultra-runner, this is ever so important and I have found I need a ton of protein.  I  decided to created these cookies to capture the flavors I’ve loved since childhood and pack a mean protein punch.  I hope you enjoy them!!

Lemon Chia Seed Protein Cookies 

Paleo, Gluten Free, Soy Free, Low Sugar    /  Makes 6 nice sized protein bombs!

 Ingredients

Lemon Chia Seed Protien Cookies

  • ½ cup Quest Multi Purpose Protein Powder (this protein powder is unsweetened, if using a sweetened protein powder reduce coconut sugar to 1/4 cup)
  • ¼ cup coconut flour
  • ½ cup almond meal/flour
  • ½ tsp baking soda
  • 2 Tbsp chia seeds
  • pinch of sea salt
  • ½ cup coconut sugar
  • 1 large egg
  • 1 large egg yolk
  • Zest of 2 lemons
  • ½ tsp lemon extract
  • ½ tsp vanilla extract
  • ¼ cup fresh squeezed lemon juice (about 1.5 lemons)
  • ¼ cup melted coconut oil

Directions:

Measure all dry ingredients into a medium bowl and whisk together until incorporated.  In a separate bowl whisk egg and egg yolk and then add coconut sugar and the rest of the wet ingredients and mix until smooth(ish) .  Pour wet ingredients into the medium bowl with the dry ingredients and mix together to a dough like consistency.  Form ingredients into a ball, wrap plastic, and let hang out in the fridge for 30 minutes for flavors to develop.  In the meantime, heat your over to 350 and line a cookie sheet with parchment paper.  Remove the dough from the fridge and roll into 6 evenly sized cookies.  Cookies won’t spread out much so you can place them fairly close together.   Bake for 10 – 12 minutes for a soft cookie.  Remove from oven and let cool completely.  If you have leftovers, store them in a airtight container in the fridge.

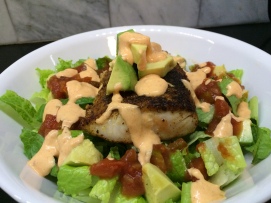
Spice Crusted Mahi Mahi Salad

kelley on beachOn Christmas Eve, I returned home from a warm vacation on the beaches of Ecuador. I was there visiting my boyfriend partway through his motorcycle journey from Columbia to Argentina. Now I would be lying if I said I don’t love bread (shit bro…who don’t!) but it seriously makes me feel like crap so I try not to eat it. It seems like every meal we were served in Ecuador was all about bread or rice. I did indulge but I also had some of the most amazing seafood ever! Ceveche was my favorite preparation. Whenever I return home from a trip I try to recreate some of the flavors of what I ate and put my own twist on it.  Now that the holidays are over,  I am trying to get back into my normal eating pattern so I decide to post this delicious simple salad for you all to enjoy!

mahi mahi

Spice Crusted Mahi Mahi Salad (serves 4)

Dairyfree, Glutenfree, Nutfree

  • I lb of Mahi Mahi fillets
  • 1 Tbsp avocado oil
  • 1 1/2 tsps salt
  • 1 tsp pepper
  • Pinch of cayenne pepper
  • 1 Tbsp ground cumin
  • 1 Tbsp ground coriander
  • 1 Tbsp ground chili powder
  • 2 hearts of romaine chopped
  • ¼ head finely shredded purple cabbage
  • ¼ heard finely shredded green cabbage
  • 1 large avocado pitted and diced into 4 portions
  • 1/2 cup of your favorite jarred salsa or pico de gallo (recipe coming soon!)
  • 1 recipe Creamy Chipotle Dressing (See Below)

Instructions:

Pat Mahi Mahi fillets dry with paper towels.  In a small bowl mixed together all the spices until well incorporated.  Lay fillets out on a plate or piece of parchment paper and sprinkle both sides of each fillet until nicely coated. Pat spices into fish to create a nice crust.  Let the fillets hang out for a few minutes and soak of the favors while you prep your dressing!  After dressing is prepped, heat the oil in a shallow  pan on medium high heat.  Add the Mahi Mahi to the hot pan and cook for 3 minutes on each side.  While fish is cooking chop up lettuce and cabbage.  Plate lettuce and cabbage on 4 separate plates with the avocado portions.  Once fish is cooked, evenly distribute between the 4 salads.  Top with salsa and Creamy Chipotle Dressing and devour!!

Creamy Chipotle Dressing

Dairyfree, Glutenfree, Nutfree

  • 1 cup of your favorite all natural mayo (I like Hampton Creek “Just Mayo”)
  • juice of 1 1/2 – 2 limes (adjust to desired thickness of dressing)
  • 2 Tbsp of adobo sauce (from a 7oz can of chipotle peppers in adobo sauce)
  • 2 tsp of honey
  • 1 tsp of garlic powder
  • 1 tsp of onion powder
  • 1 Tbsp smoked paprika
  • pinch of salt and pepper to taste

Instruction:

Put all ingredients into a glass mason jar, screw on lid and shake until incorporated and smooth!  Let chill in the the fridge while you cook your fish and prep your salad

Flagline 50k Recap

photo 3

My decision to enter this race was based upon a challenge from one of the Facebook friends I haven’t seen since high school.  I never turn down a dare or a challenge!   Little did I know what I signing up for.

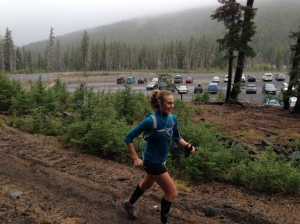
I followed pretty much a regular 50k training plan and somehow disregarded the whole “trail” thing.  Two of my running buddies were nice enough to join me for a 26 mile Wildwood trail run 2 weeks before the big day and we ended up running it in about 5 hours.  I was surprised how my soreness was so different from running the same distance on the road.  It was mostly the tendons and things around my feet and ankles that were sore but the recovery time was surprisingly quick.  I knew my body was up for the task!!  The week before the race, I kinda started to psych myself out about the distance and how I had no idea what the trail was going to be like, but I decided to think about the race piece by piece and told myself that I was just going to relax and enjoy the beauty and awesome weather that all of my other runs in the Bend area have offered me in the past. 

My boyfriend was nice enough to accompany me over the mountain the night before the race and wait for me at the finish line.  We had this delicious dinner and a beer at Baldy’s BBQ.  What a great way to fuel!

photo 

For weeks I’d been looking at the Bend weather just to make sure it wasn’t going to be raining.  The forecast said chilly but sunny.  It somehow slipped my mind that I was going to be running on Mt. Bachelor and not actually in Bend.  The morning of the race when we left our hotel to make the 25 minute drive to Sunset Lodge, it was windy, chilly, & misty.  I tried to remain positive as I watched the outside temperature gauge in my car drop from 47 to 38 as we climbed in elevation.  Once we reached the lodge I knew I was in trouble….the wind whipped and the chill was sobering.  “Holy shit!” my boyfriend remarked as he opened his door to help me gather my things…”are you sure you don’t want to go home?”  “Shut up!  No!”  I said, even more determined than ever to conquer the race.

“Good luck! Love you!” he said as I stepped out into the biting wind and trotted to the shuttle van.  There was a buzz of excitement and dread amongst the runners huddled in the van savoring ever last minute of warmth before being delivered to the mercies of the mountain for the next 5, 6, 7, 8 hours.  As we gathered at the starting line one lively gentleman in his late 60’s exclaimed “Hello Idiots” which prompted a hesitant giggle from the small crowd of 7am early start runners.  Dave the race coordinator met us at the starting line and basically said “ready, set, go” and we were off. 

This isn’t so bad I thought to myself as I bounced off the soft mossy padded dirt trail.  Before I hit the first mile I got my first small taste of elevation gain.  I was suddenly feeling a shortage of breath unfamiliar to me…oh crap…the elevation is going to get me I thought.  I eased back and caught my breath and enjoyed the next 8 miles listening to a mix of Beck, Rhianna, & JT running almost by myself in the middle of a gorgeous wooded paradise with just a tiny drizzle sprinkling my face. 

The first Aid station at mile 8 came so quickly that I was like “pfffftt….keep your GU…I got this”.  If only I knew what lay ahead for me in the next 7 miles.  My left calf had flared up a little bit on my last training run and at about mile 9 it again made its presents known.  Couple that with massive elevation gain, dropping temperatures, and finally a snow storm, and you have yourself the recipe for a major come to Jesus running moment.  Everything from crying, to telling myself I must be injured and couldn’t possible finish the run, to dear Lord what if I  somehow wander off the trail and they don’t find me till spring entered my head.  “Get it together, you’ve trained for this and you’ve done way harder shit….well maybe not but you’ve still done some hard shit….quitting will feel way worse than finishing this thing in a little pain….think about how great it will feel at the end”.  I decided to hold onto the thought of what this accomplishment would feel like at the end and that is what kept me going. 

At the next aid station I actually felt sorry for the poor souls who had given up a whole Saturday to hang out in a blizzard and give gummy bears and salted potatos to weirdos in compression sock.  That was mile 15… nearly half way done.  “I can do this”.  I clung firmly to the goal of 6 hours and check my watch intermittently to see how I was pacing.  The next aid station was at mile 17 and comically labeled as The Luau.  I ate some salty chips, high 5’d a few people in plastic leis and was off.  My calf was aching and I couldn’t feel my hands but dammit  I was more than half way done!  From them on out I enjoyed the scenery; massive brain like mushrooms, meadows and creeks.  At mile 21 an awesome lady in a down jacket with a cow bell ran along side me and shouted “mile 21!” and told me I looked great in my running skirt.  I text my boyfriend to let him know I was 10 miles out and was running in snow.  I gave myself permission to speed walk the last couple killer hills. The trail looped back around and I hit the Luau station a second time at mile 24 and started to feel awesome.  7 miles left!!  I gulped down a caffeinated GU, stopped to pee (I’m pretty sure some dude saw my butt) and continued down the mountain.  The rest of the trail was either flat or downhill and I savored every moment.  Around mile 27 the trail was completely exposed just just in time for a lovely sideways wind & sleet storm.  Full body exfoliation….BONUS!  At this point I just started laughing at how ridiculous this was and I was giddy because I was only 4 miles out.

Final text to my guy telling him I was almost done.  He replied that he was waiting for me at the end and I couldn’t wait to see him!  I booked it down hill for the next 3 miles and got so excited when I saw the highway that I wanted to jump up and down if I could’ve.  The next 2 miles felt like FOR…EV….ER.  Once back on pavement….the mean people who designed the course had us run up a giant hill to the lodge.  I’m pretty sure I said “are you f**cking kidding me” out loud.  Once I saw the roof of the lodge I didn’t care I just ran.  I finished the race in 6 hours 9 minutes and ate the delicious Mexican cuisine the race organizers had set up for us.    When I saw my boyfriend at the end I told him that I never needed to do that again but as the weeks went by after the race I felt myself craving another challenge….perhaps a 50 miler??

photo 2


So I’m starting this blog….

The three things I love the most are cooking, fitness, and adventure. Why not write about it then? The singing part comes from my childhood dream being the white Whitney Houston….of course I grew up in an era before email, youtube, and American Idol so I had a tough time getting noticed. However I did get to meet with a high powered record exec, tour around the country, record on several albums but that is a different story. Needless to say I didn’t make it (boo-hoo) but I love my life now and that’s what I’m writing about.

Cooking: I spends lots of my time dreaming up recipes based on inspirations I’ve collected from my travels, other cooks I admire, foods I love, and what would win the accolades of my super awesome fella. Bottom line is I adore making others happy with food.image

Fitness: I am a distance runner. I love pushing my body to its limits,  getting stronger and faster, and accomplishing goals I never dreamed I could achieve. These things that are fun for me often make others think I’m nuts. image

Adventure: ” An adventure is an exciting or unusual; it may also be a bold, usually risky undertaking, with an uncertain outcome”. In the past year I’ve sailed along the coast of Turkey, hiked active volcanos in Guatemala, and ridden from Oregon to Alaska on the back of a motorcycle. I’m addicted and many more adventures are yet to come. image